【背景】
折腾:
期间,下载和安装go,运行了hello world后,就是去参考官网:
去学习,如何写go代码了。
【折腾过程】
1.go语言中,用来获取,编译,安装go语言包的标准工具,是:go命令
2.关于go命令,去看看go help的输出:
1 2 3 4 5 6 7 8 9 10 11 12 13 14 15 16 17 18 19 20 21 22 23 24 25 26 27 28 29 30 31 32 33 34 35 36 37 38 | D:\tmp\tmp_dev_root\go\helloworld>go helpGo is a tool for managing Go source code.Usage: go command [arguments]The commands are: build compile packages and dependencies clean remove object files doc run godoc on package sources env print Go environment information fix run go tool fix on packages fmt run gofmt on package sources get download and install packages and dependencies install compile and install packages and dependencies list list packages run compile and run Go program test test packages tool run specified go tool version print Go version vet run go tool vet on packagesUse "go help [command]" for more information about a command.Additional help topics: gopath GOPATH environment variable packages description of package lists remote remote import path syntax testflag description of testing flags testfunc description of testing functionsUse "go help [topic]" for more information about that topic.D:\tmp\tmp_dev_root\go\helloworld> |
3.用go命令的话,需要你按照特定的方式去安排组织你的代码。
4.感兴趣的,可以看官网录制的视频教程:
[Video] Writing, building, installing, and testing Go code
5.go代码必须是在一个workspace内。
workspace是一个文件夹(目录),其包含三个子文件夹:
- src:包含go的源码
- pkg:包含package的目标文件
- bin:包含可执行的命令
go命令,就是去编译(src内的)源码包,并且安装生成二进制到pkg和bin中。
一个典型目录结果是这样的:
1 2 3 4 5 6 7 8 9 10 11 12 13 14 15 16 17 18 19 20 21 22 23 24 25 | bin/ streak # command executable todo # command executablepkg/ linux_amd64/ code.google.com/p/goauth2/ oauth.a # package object github.com/nf/todo/ task.a # package objectsrc/ code.google.com/p/goauth2/ .hg/ # mercurial repository metadata oauth/ oauth.go # package source oauth_test.go # test source github.com/nf/ streak/ .git/ # git repository metadata oauth.go # command source streak.go # command source todo/ .git/ # git repository metadata task/ task.go # package source todo.go # command source |
6.开发go的话,需要设置,唯一一个环境变量:GOPATH
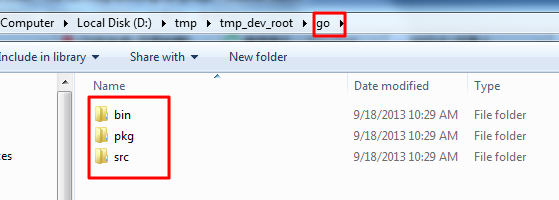
去把此处我的go的目录:
D:\tmp\tmp_dev_root\go
如图:
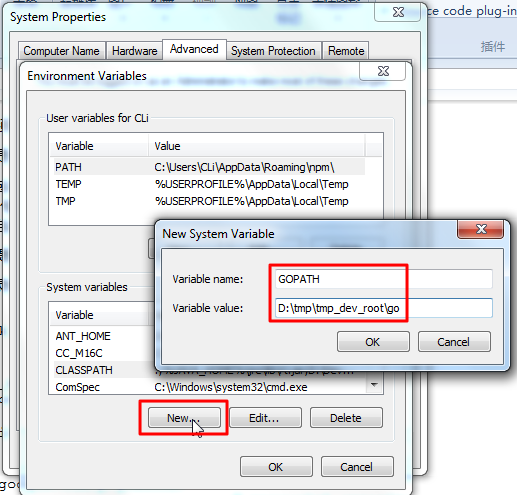
设置到此变量中:
1 | GOPATH = D:\tmp\tmp_dev_root\go |
如图:
再把
D:\tmp\tmp_dev_root\go\bin
也加到PATH中去。
7.开发自己的go语言的模块的话,要尽量避免名字和go语言系统内置的模块名所冲突。
8.安装提示,去建立好了文件夹和文件:
D:\tmp\tmp_dev_root\go\src\github.com\user\hello\hello.go
然后去:
1 | go install github.com/user/hello |
如图:
执行了,但是没有任何输出。
9.果然,安装了后,任何地方,都可以调用我的hello了:
1 2 3 4 5 6 7 8 9 10 11 12 13 14 15 16 17 18 | D:\tmp\tmp_dev_root\go\src>go install github.com/user/helloD:\tmp\tmp_dev_root\go\src>hellohello, worldD:\tmp\tmp_dev_root\go\src>dir Volume in drive D has no label. Volume Serial Number is CECE-859F Directory of D:\tmp\tmp_dev_root\go\src09/18/2013 10:34 AM <DIR> .09/18/2013 10:34 AM <DIR> ..09/18/2013 10:34 AM <DIR> github.com 0 File(s) 0 bytes 3 Dir(s) 139,561,541,632 bytes freeD:\tmp\tmp_dev_root\go\src> |
10.然后,可以看到,bin下面有hello.exe:
1 2 3 4 5 6 7 8 9 10 11 12 13 14 15 16 17 18 19 20 21 22 23 24 25 26 27 28 29 30 31 32 33 34 35 36 37 38 39 40 41 42 43 44 45 46 47 48 49 50 51 52 53 54 55 56 57 58 59 60 61 62 63 64 65 66 67 68 69 70 71 72 73 74 75 76 77 78 79 80 81 82 83 84 85 86 87 88 | D:\tmp\tmp_dev_root\go\src>dir Volume in drive D has no label. Volume Serial Number is CECE-859F Directory of D:\tmp\tmp_dev_root\go\src09/18/2013 10:34 AM <DIR> .09/18/2013 10:34 AM <DIR> ..09/18/2013 10:34 AM <DIR> github.com 0 File(s) 0 bytes 3 Dir(s) 139,561,541,632 bytes freeD:\tmp\tmp_dev_root\go\src>cd github.comD:\tmp\tmp_dev_root\go\src\github.com>cd userD:\tmp\tmp_dev_root\go\src\github.com\user>cd helloD:\tmp\tmp_dev_root\go\src\github.com\user\hello>dir Volume in drive D has no label. Volume Serial Number is CECE-859F Directory of D:\tmp\tmp_dev_root\go\src\github.com\user\hello09/18/2013 10:34 AM <DIR> .09/18/2013 10:34 AM <DIR> ..09/18/2013 10:11 AM 82 hello.go 1 File(s) 82 bytes 2 Dir(s) 139,561,541,632 bytes freeD:\tmp\tmp_dev_root\go\src\github.com\user\hello>cd ../../../D:\tmp\tmp_dev_root\go\src>dir Volume in drive D has no label. Volume Serial Number is CECE-859F Directory of D:\tmp\tmp_dev_root\go\src09/18/2013 10:34 AM <DIR> .09/18/2013 10:34 AM <DIR> ..09/18/2013 10:34 AM <DIR> github.com 0 File(s) 0 bytes 3 Dir(s) 139,561,541,632 bytes freeD:\tmp\tmp_dev_root\go\src>cd ../binD:\tmp\tmp_dev_root\go\bin>dir Volume in drive D has no label. Volume Serial Number is CECE-859F Directory of D:\tmp\tmp_dev_root\go\bin09/18/2013 10:36 AM <DIR> .09/18/2013 10:36 AM <DIR> ..09/18/2013 10:36 AM 1,558,016 hello.exe 1 File(s) 1,558,016 bytes 2 Dir(s) 139,561,541,632 bytes freeD:\tmp\tmp_dev_root\go\bin>cd ..D:\tmp\tmp_dev_root\go>dir Volume in drive D has no label. Volume Serial Number is CECE-859F Directory of D:\tmp\tmp_dev_root\go09/18/2013 10:29 AM <DIR> .09/18/2013 10:29 AM <DIR> ..09/18/2013 10:36 AM <DIR> bin09/18/2013 10:29 AM <DIR> pkg09/18/2013 10:34 AM <DIR> src 0 File(s) 0 bytes 5 Dir(s) 139,561,541,632 bytes freeD:\tmp\tmp_dev_root\go>cd pkgD:\tmp\tmp_dev_root\go\pkg>dir Volume in drive D has no label. Volume Serial Number is CECE-859F Directory of D:\tmp\tmp_dev_root\go\pkg09/18/2013 10:29 AM <DIR> .09/18/2013 10:29 AM <DIR> .. 0 File(s) 0 bytes 2 Dir(s) 139,561,541,632 bytes freeD:\tmp\tmp_dev_root\go\pkg> |
11.此处暂且不用git或svn去管理代码了。
所以,暂且不去理会那些提交代码的事情了。
12.不过,倒是可以继续参考教程,去建立我自己的crifanLib.go的库的:
1 2 3 4 5 6 7 8 9 10 11 12 13 14 15 16 17 18 19 20 21 22 23 24 25 26 27 | D:\tmp\tmp_dev_root\go\pkg>pwd/cygdrive/d/tmp/tmp_dev_root/go/pkgD:\tmp\tmp_dev_root\go\pkg>cd ../src/D:\tmp\tmp_dev_root\go\src>cd github.comD:\tmp\tmp_dev_root\go\src\github.com>cd userD:\tmp\tmp_dev_root\go\src\github.com\user>mkdir crifanLibD:\tmp\tmp_dev_root\go\src\github.com\user>cd crifanLibD:\tmp\tmp_dev_root\go\src\github.com\user\crifanLib>lsD:\tmp\tmp_dev_root\go\src\github.com\user\crifanLib>dir Volume in drive D has no label. Volume Serial Number is CECE-859F Directory of D:\tmp\tmp_dev_root\go\src\github.com\user\crifanLib09/18/2013 10:42 AM <DIR> .09/18/2013 10:42 AM <DIR> .. 0 File(s) 0 bytes 2 Dir(s) 139,561,541,632 bytes freeD:\tmp\tmp_dev_root\go\src\github.com\user\crifanLib> |
再去建立文件:
1 2 3 4 5 6 7 8 9 10 11 12 13 14 | D:\tmp\tmp_dev_root\go\src\github.com\user\crifanLib>lscrifanLib.goD:\tmp\tmp_dev_root\go\src\github.com\user\crifanLib>ls -lhals: invalid option -- hTry `ls --help' for more information.D:\tmp\tmp_dev_root\go\src\github.com\user\crifanLib>ls -latotal 1drwxr-xr-x 2 CLi Administ 0 Sep 18 10:43 .drwxr-xr-x 4 CLi Administ 0 Sep 18 10:42 ..-rw-r--r-- 1 CLi Administ 82 Sep 18 10:11 crifanLib.goD:\tmp\tmp_dev_root\go\src\github.com\user\crifanLib> |
13.然后,就是继续去编写库函数了。尤其是网络相关的。
但是算了,还是先从最基本的,把所有代码都放在单个文件:EmulateLoginBaidu.go中吧:
D:\tmp\tmp_dev_root\go\src\github.com\user\EmulateLoginBaidu\EmulateLoginBaidu.go
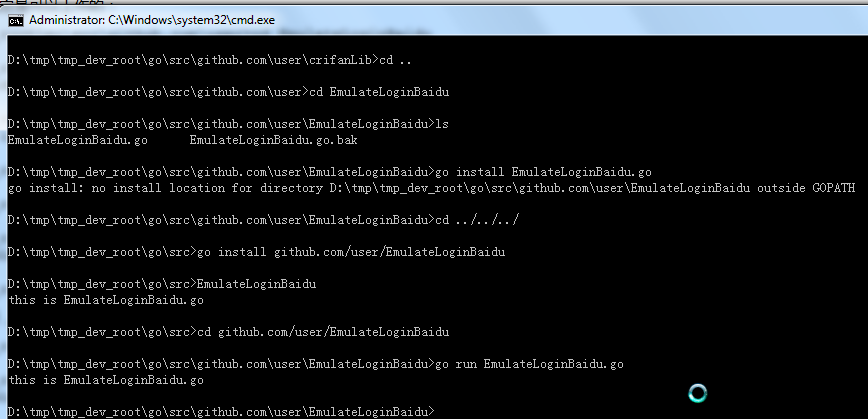
然后,就是去编译确定是可以工作的:
1 2 3 4 5 6 7 8 9 10 11 12 13 14 15 16 | D:\tmp\tmp_dev_root\go\src\github.com\user>cd EmulateLoginBaiduD:\tmp\tmp_dev_root\go\src\github.com\user\EmulateLoginBaidu>lsEmulateLoginBaidu.go EmulateLoginBaidu.go.bakD:\tmp\tmp_dev_root\go\src\github.com\user\EmulateLoginBaidu>go install EmulateLoginBaidu.gogo install: no install location for directory D:\tmp\tmp_dev_root\go\src\github.com\user\EmulateLoginBaidu outside GOPATHD:\tmp\tmp_dev_root\go\src\github.com\user\EmulateLoginBaidu>cd ../../../D:\tmp\tmp_dev_root\go\src>go install github.com/user/EmulateLoginBaiduD:\tmp\tmp_dev_root\go\src>EmulateLoginBaiduthis is EmulateLoginBaidu.goD:\tmp\tmp_dev_root\go\src> |
不去编译,直接运行,也是可以的:
1 2 3 4 5 6 | D:\tmp\tmp_dev_root\go\src>cd github.com/user/EmulateLoginBaiduD:\tmp\tmp_dev_root\go\src\github.com\user\EmulateLoginBaidu>go run EmulateLoginBaidu.gothis is EmulateLoginBaidu.goD:\tmp\tmp_dev_root\go\src\github.com\user\EmulateLoginBaidu> |
如图:
【总结】
好了,基本的go的目录结构搞好了,余下的,就是去一点点学习对应的模块,去写代码了。
转载请注明:在路上 » 【记录】学习如何写go语言代码


