之前Xcode8中,某个swift项目运行的是好好的,其中布局用到了Cartography。
后来为了解决检索和编译慢,而升级到Xcode9,之后为了能正常编译和链接又通过Carthage升级了各个库,最后(应该是同样的代码)但是:
布局错乱了
此处的文字“工作日历” 没有像之前一样居中对齐
去调试,加上了背景色:
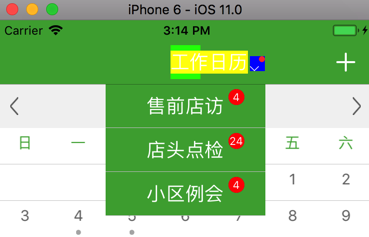
看出来是绿色的背景,对应着此处代码中的:
func changTitleView(_ title:String){ self.taskBarView = UIView(frame: CGRect(x: 0.0, y: 0.0, width: 80, height: 44.0)) var count = Int.InvalidIndex switch self.curTaskVCType { case .workCalendar: count = self.taskCount.calendars.count case .communityMeeting: count = self.taskCount.meeting case .shopVisit: count = self.taskCount.visit case .shopHeadInspection: count = self.taskCount.inspection } self.taskBarViewButton = TitleImageButton( title: title, count: count, taskVCType:self.curTaskVCType, titleFont: NavigationBarTextFont, titleTextColor: UIColor.white, titleWidth: 80, titlePaddingLeft: 0 ) self.taskBarViewButton.backgroundColor = UIColor.green self.taskBarView.addSubview(self.taskBarViewButton) self.taskBarView.backgroundColor = UIColor.red constrain(self.taskBarViewButton) {myCustomerButton in //myCustomerButton.center = myCustomerButton.superview!.center myCustomerButton.top == myCustomerButton.superview!.top myCustomerButton.left == myCustomerButton.superview!.left myCustomerButton.right == myCustomerButton.superview!.right myCustomerButton.bottom == myCustomerButton.superview!.bottom } self.taskBarViewButton.addTarget(self, action: #selector(self.toggleSwitchTask(_:)), for: UIControlEvents.touchUpInside) SingletonMainVC().navigationItem.titleView = self.taskBarView } |
taskBarViewButton的问题
此处,把部分代码改为:
// leftTitleLabel.left == leftTitleLabel.superview!.left – titlePaddingLeft leftTitleLabel.centerX == leftTitleLabel.superview!.centerX leftTitleLabel.width == titleWidth |
使得此处的title的宽度是正常的,传入进来的80
然后文字可以居中显示了:
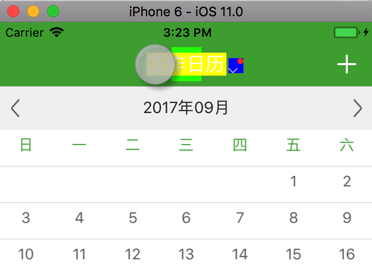
但是有个问题:
点击上述的黄色区域的左右两边,非绿色区域范围,则不响应
-》只有点击绿色区域,才能响应 弹出列表
换了:
constrain(self.taskBarViewButton) {taskBarViewButton in taskBarViewButton.top == taskBarViewButton.superview!.top taskBarViewButton.bottom == taskBarViewButton.superview!.bottom // taskBarViewButton.left == taskBarViewButton.superview!.left // taskBarViewButton.right == taskBarViewButton.superview!.right taskBarViewButton.width == taskBarViewButton.superview!.width taskBarViewButton.center == taskBarViewButton.superview!.center } |
问题依旧。
感觉是:
SingletonMainVC().navigationItem.titleView = self.taskBarView
没有起到效果一样。
虽然搜搜:
ios 11 navigationItem.titleView
真的找到了,别人也有类似问题:
xcode – iOS11 navigationItem.titleView 适配问题 – SegmentFault
尝试:
self.taskBarView.intrinsicContentSize = self.taskBarView.frame.size
结果报错:
Cannot assign to property: ‘intrinsicContentSize’ is a get-only property
uinavigationcontroller – iOS 11 navigationItem.titleView Width Not Set – Stack Overflow
I had to override the intrinsicContentSize getter for the view, and the text field.
但是不知道如何写代码啊。。。
iphone – Use the increased navigation-bar title in iOS 11 – Stack Overflow
然后代码改为:
定义:
class NaviBarTitleView: UIView { override var intrinsicContentSize: CGSize { // return CGFloat.greatestFiniteMagnitude return UILayoutFittingExpandedSize } } |
使用:
//self.taskBarView = UIView(frame: CGRect(x: 0.0, y: 0.0, width: 80, height: 44.0)) //fixbug: iOS 11 navigationItem.titleView customize view width not work self.taskBarView = NaviBarTitleView(frame: CGRect(x: 0.0, y: 0.0, width: 80, height: 44.0)) 。。。 self.taskBarViewButton.addTarget(self, action: #selector(self.toggleSwitchTask(_:)), for: UIControlEvents.touchUpInside) SingletonMainVC().navigationItem.titleView = self.taskBarView gLog.debug(“SingletonMainVC().navigationItem.titleView?.intrinsicContentSize=\(SingletonMainVC().navigationItem.titleView?.intrinsicContentSize)”) |
后显示效果,至少是宽度是有了:
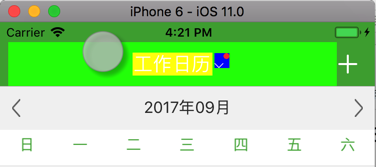
但是:
显示的宽度,也还是太宽了
以及log中显示出的宽度是10000:
SingletonMainVC().navigationItem.titleView?.intrinsicContentSize=Optional((10000.0, 10000.0))
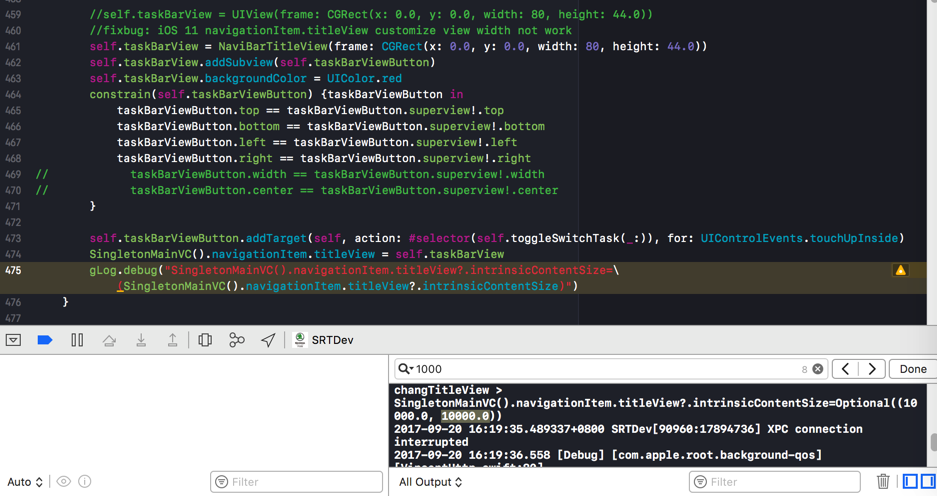
所以,为了符合此处的逻辑,去把宽高改为80和44,结果出错:
【已解决】Xcode9和iOS11中出错:CGSizeMake is unavailable in Swift
改了80×44,对于此处的显示问题,是已经解决了:
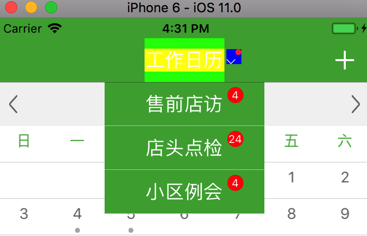
但是可以看出,和点击黄色按钮后的弹出列表的宽度,还是不一致的,所以要再去保持一致
然后把代码改为:
let NaviBarTitleViewWidth:CGFloat = 160.0 let NaviBarTitleViewHeight:CGFloat = 44.0 class NaviBarTitleView: UIView { override var intrinsicContentSize: CGSize { // return CGFloat.greatestFiniteMagnitude // return UILayoutFittingExpandedSize return CGSize(width: NaviBarTitleViewWidth, height: NaviBarTitleViewHeight) } } |
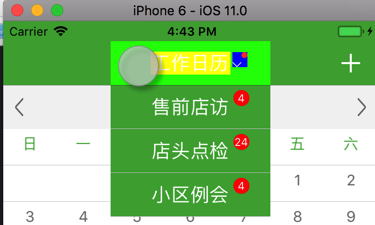
就达到要的效果了:
【总结】
此处,iOS11升级后,navigationItem.titleView的内部机制变化了,对应的navigationItem.titleView的width(好像是依赖于自动布局autolayout去判断了?)此处是0,导致导航栏中的标题显示异常。
解决办法是:
把之前赋值给navigationItem.titleView的(直接用的是)UIView,重写intrinsicContentSize,返回对应的,自己此处固定的size(宽和高)
对应代码为:
import UIKit let NaviBarTitleViewWidth:CGFloat = 160.0 let NaviBarTitleViewHeight:CGFloat = 44.0 class NaviBarTitleView: UIView { override var intrinsicContentSize: CGSize { // return CGFloat.greatestFiniteMagnitude // return UILayoutFittingExpandedSize return CGSize(width: NaviBarTitleViewWidth, height: NaviBarTitleViewHeight) } } //self.taskBarView = UIView(frame: CGRect(x: 0.0, y: 0.0, width: 80, height: 44.0)) //fixbug: iOS 11 navigationItem.titleView customize view width not work self.taskBarView = NaviBarTitleView(frame: CGRect(x: 0.0, y: 0.0, width: 80, height: 44.0)) self.taskBarViewButton.addTarget(self, action: #selector(self.toggleSwitchTask(_:)), for: UIControlEvents.touchUpInside) SingletonMainVC().navigationItem.titleView = self.taskBarView |
即可达到对应的此处的目的:
title的宽度是正常的,且居中对齐
且内部有个button,也可以被正常点击到(显示出下拉列表)了。
转载请注明:在路上 » 【已解决】Xcode9中iOS布局文字没有居中对齐